Deploying a Ruby on Rails application to Google Kubernetes Engine: a step-by-step guide - Part 1: Introduction and creating cloud resources
Introduction
Update: I’ve now created a premium training course, Kubernetes on Rails, which takes some inspiration from this blog post series but updated with the latest changes in Kubernetes and Google Cloud and greatly simplified coursework based on feedback I got from these blog posts. All packaged up in an easy-to-follow screencast format. Please check it out! ☺️ - Abe
Welcome to part one of this five-part series on deploying a Rails application to Google Kubernetes Engine. If you’d like to jump ahead, you can visit the following parts:
Part 2: Up and running with Kubernetes
Part 3: Cache static assets using Cloud CDN
Part 4: Enable HTTPS using Let’s Encrypt and cert-manager
Part 5: Conclusion, further topics and Rails extras
Following up on my last post on why I’m switching personal projects from AWS to Google Cloud (GCP), this series of posts will walk through deploying an example Ruby on Rails application to GCP’s Kubernetes Engine (GKE). You should be able to follow this tutorial without experience with Ruby or Rails (please let me know if I fail at this).
We will deploy a simple app that allows anyone to upload images with captions:
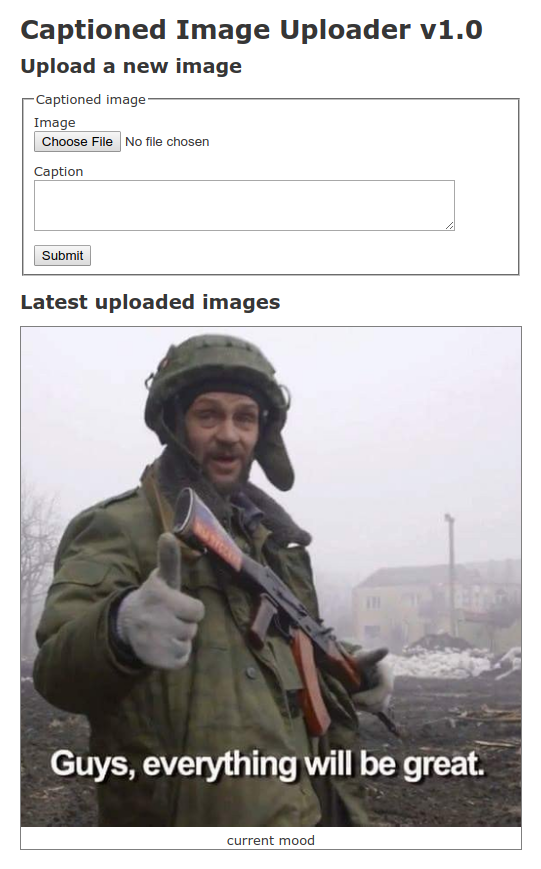
Uploaded images will be stored in Cloud Storage and the captions will be stored in Cloud SQL Postgres.
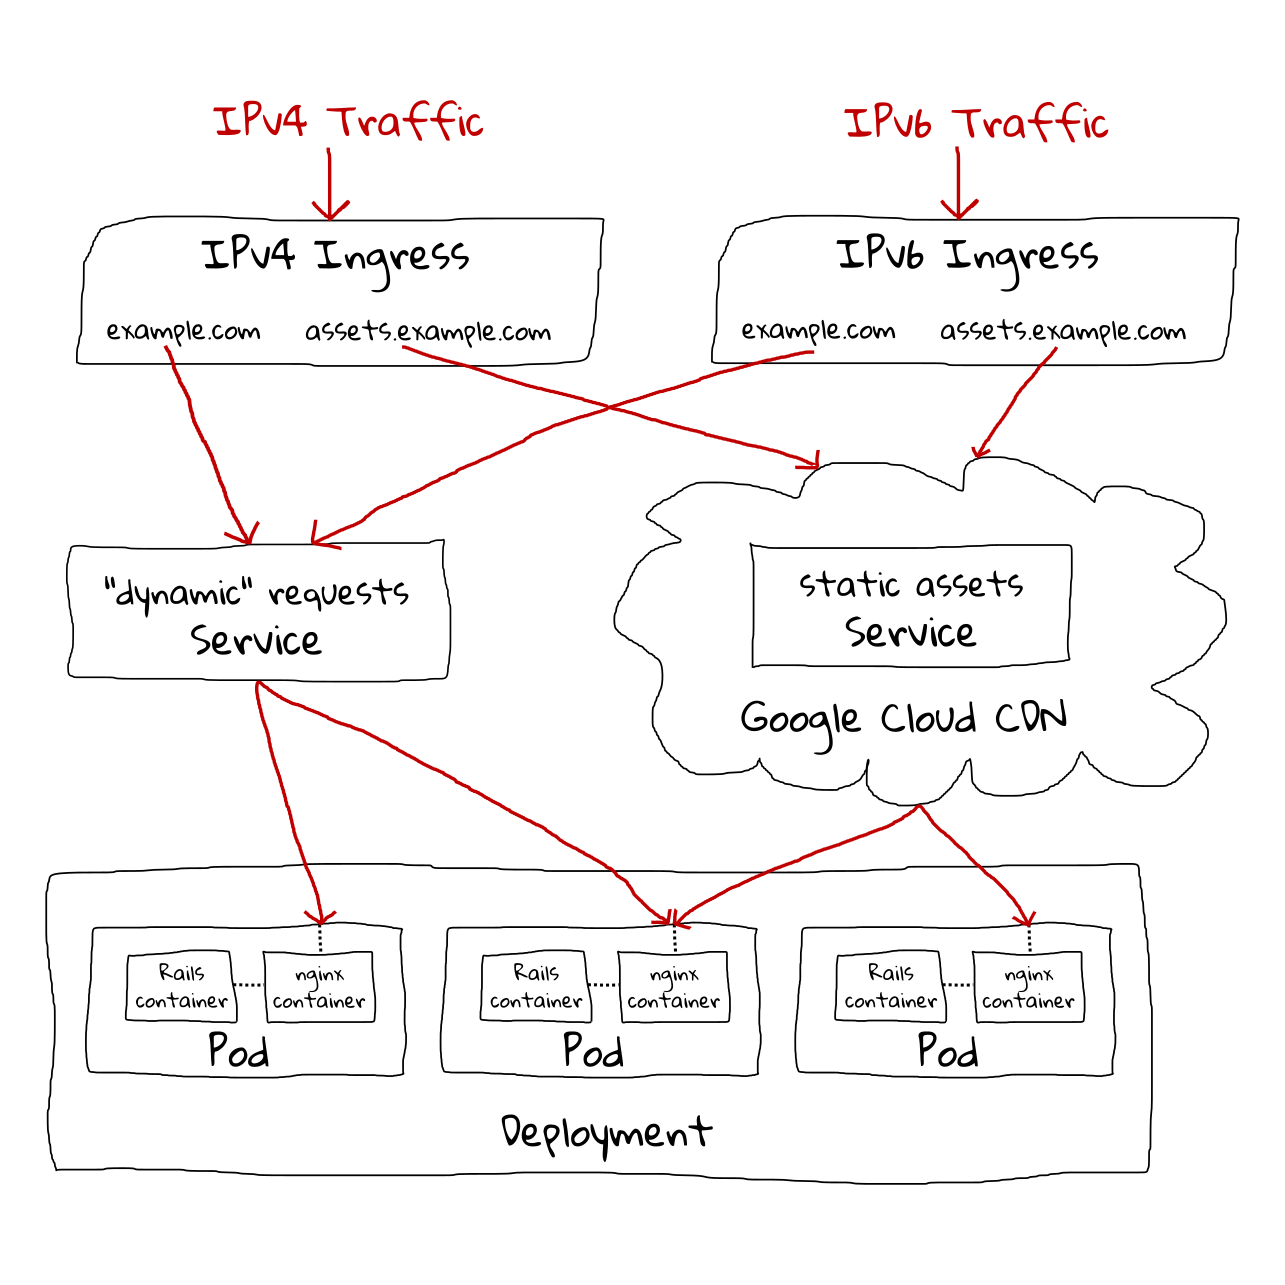
We’ll also cover serving Brotli-compressed static assets from an nginx sidecar container with Cloud CDN caching enabled on a cookieless domain, performing remote Docker builds using Container Builder and Container Registry, using jemalloc to improve memory usage/performance, IPv6 support, and popping a remote rails console for debugging.
Warning: Running this demo will create resources on GCP and may incur a small cost while running. Remember to delete the project when you are finished so that you don’t get charged unnecessarily:
$ gcloud projects delete $PROJECT_ID
Prerequisites
- Sign up for Google Cloud
- Install the Google Cloud SDK, which will install the
gcloudandgsutilCLI tools - Install
kubectlCLI tool1 - Install
jq, needed for some scripting - Have 2 DNS addresses that you can make A and AAAA records for. One will be used for hosting the web app, and the other static assets.
Clone the demo app
First let’s clone the demo Rails app from GitHub:
$ git clone https://github.com/abevoelker/gke-demo.git
If you’re a Ruby/Rails developer, I put notes in the final post of the series about how and why I made some choices when writing/packaging this app that may interest you.
Although not required for the rest of the tutorial, if you’d like to test the app out locally you can install docker-compose and run:
$ docker-compose up
Which will bring up a development version of the application at http://localhost:3000.
Create GCP project and resources
Next we’ll create the GCP resources to run our app.
If you haven’t initialized the Google Cloud SDK to your account by executing gcloud auth login and gcloud init, do so now. It will prompt to choose various default values, including an automatically-generated project ID to start with - go ahead and accept all defaults presented. We will create a new project in a moment for our purposes.
Project
Let’s create a GCP project for our demo app. Project IDs have to be unique across all of GCP, so unfortunately my project name cannot be the same as yours. Let’s generate a unique project ID and store it in an environment variable for convenience:
$ export PROJECT_ID="captioned-images-$(openssl rand -hex 6)"
$ echo $PROJECT_ID
captioned-images-cbc464e43d1b
In practice on your own projects you probably won’t have to add this random junk to the end of your project IDs. For example, plain old captioned-images was available when I wrote this post.
Now let’s create the GCP project for our demo app:
$ gcloud projects create --set-as-default $PROJECT_ID
--set-as-default switches gcloud’s project context to our newly-created one, meaning all subsequent gcloud commands will operate on this project by default. If at any time you want to switch the project context, you do so by setting a global “project” config value2 like so:
$ gcloud config set project some-other-project-name
To see the current project context, you can read the project config value like so:
$ gcloud config get-value project
Or list all current config values with
$ gcloud config list
Other default properties are also controlled by config values, such as default region and zone. Let’s set those now:
$ gcloud config set compute/zone us-central1-a
$ gcloud config set compute/region us-central1
Enable billing
Before we get to the next step and create actual resources, enable billing in the web console for this project. Otherwise, resource creation commands will fail - sometimes with misleading errors like “The account for <resource> has been disabled.”
DNS
The first thing we’ll do is reserve IP addresses for our app and set up DNS. This will give DNS some time to propagate while we set up the rest of the app.
First we need to enable the Compute API:
$ gcloud services enable compute.googleapis.com
Note: We’ll be enabling a lot of little APIs as we work through this tutorial. It can be annoying running into these kinds of errors when certain APIs aren’t enabled:

But Google often makes it easy to recover by providing an exact URL to visit to enable the API in the web console.
The upside to having to enable all these miscellaneous APIs is that your project is more secure by default and you’ll have less billing surprises.
Then we’ll reserve the IP addresses:
$ gcloud compute addresses create captioned-images-ipv4-address --global --ip-version IPV4
$ gcloud compute addresses create captioned-images-ipv6-address --global --ip-version IPV6
$ gcloud compute addresses list
NAME                           REGION  ADDRESS             STATUS
captioned-images-ipv4-address          35.201.64.7         RESERVED
captioned-images-ipv6-address          2600:1901:0:439d::  RESERVED
Warning: if you’ve signed up for a free trial GCP account, you may get an error here:
Quota 'STATIC_ADDRESSES' exceeded. Limit: 1.0 globally.
This is due to GCP quota limits for the free trial. The solution is to either upgrade to a paid account, or proceed with the tutorial without doing the IPv6 steps.
Now you should create the A and AAAA records for whatever two DNS names you chose/own for the website and assets site using the IP addresses you just reserved. I can’t give exact instructions here since you probably have a different DNS service than me, but here’s what my zone file looks like with the two DNS names I’m using and the two IP addresses I reserved above:
assets-captioned-images.abevoelker.com. 300 IN A 35.201.64.7
assets-captioned-images.abevoelker.com. 300 IN AAAA 2600:1901:0:439d::
captioned-images.abevoelker.com. 300 IN A 35.201.64.7
captioned-images.abevoelker.com. 300 IN AAAA 2600:1901:0:439d::
Finally, save your DNS addresses in a couple environment variables that we’ll refer to later on:
$ export DNS_WEBSITE="captioned-images.abevoelker.com"
$ export DNS_ASSETS="assets-captioned-images.abevoelker.com"
Cloud Storage
Now let’s create a Cloud Storage bucket to store uploaded images. Like project IDs, bucket names have to be globally unique, so once again my bucket name will be different than yours. We could re-use our project ID here as a unique bucket name, but for clarity let’s create a separate unique value for our bucket name:
$ export BUCKET_NAME="captioned-images-$(openssl rand -hex 6)"
$ echo $BUCKET_NAME
captioned-images-9fc76933f47f
Now let’s actually create the bucket using gsutil3:
$ gsutil mb -c regional -l us-central1 gs://$BUCKET_NAME
Cloud SQL
Now let’s create the Postgres SQL database that will store the captions and uploaded image metadata. If we type gcloud sql --help4 to investigate how to create the database, it might be tempting to try using gcloud sql databases first:
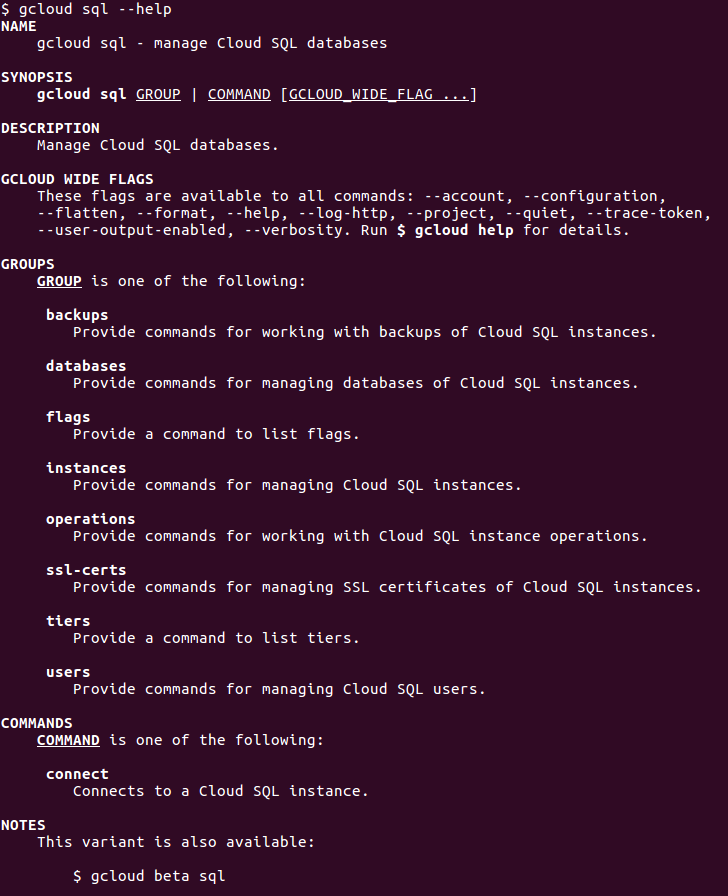
But actually that command is for managing the logical database(s), when first we actually need to create the physical resource that will run the database (an instance). We’re going to use the smallest/cheapest instance type since this is a demo app:
$ gcloud sql instances create --database-version=POSTGRES_9_6 --tier=db-f1-micro --gce-zone=us-central1-a captioned-images-db
This will take a bit of time to complete as Cloud SQL turns up the instance. Once it’s done, we’ll finally create the database:
$ gcloud sql databases create captioned-images-db --instance=captioned-images-db --charset=UTF8 --collation=en_US.UTF8
One of the most annoying things about GKE is that in order for our application to connect to Cloud SQL, it can’t just use a regular hostname:port TCP connection directly. Instead, we have to run a special sidecar container alongside our app (in the same Pod), called the Cloud SQL Proxy, which connects to the database through a secure tunnel and then exposes a regular hostname:port TCP connection to other containers in the same Pod (including our application container).
We’ll look at the proxy sidecar container more later on but for now we need to enable the SQL admin service and create a SQL user for the proxy:
$ gcloud services enable sqladmin.googleapis.com
$ gcloud sql users create proxyuser cloudsqlproxy~% --instance=captioned-images-db --password=foobar
Finally, we’ll store the SQL connection info for use later on:
$ export CONNECTION_NAME="$(gcloud sql instances describe captioned-images-db --format=json | jq -r '.connectionName')"
Kubernetes Engine
Now let’s create a Kubernetes cluster to run our app. For our database instance we used the smallest machine type available, but for GKE clusters we have to choose an instance type with enough resources to allocate workloads effectively.
The smallest VM instance type is currently f1-micro, weighing in at 0.2 vCPU and 0.6GB RAM which is a bit too shrimpy for our purposes (workloads will likely fail to allocate). Instead we’re going to use g1-small, which is the next size up at 0.5 vCPU and 1.7GB RAM. It’s still a shared-core machine type, which we probably wouldn’t want to use for a high-traffic production app, but for our demo - and probably for most side project-type apps - it’s fine.5
First we have to enable the Container API:
$ gcloud services enable container.googleapis.com
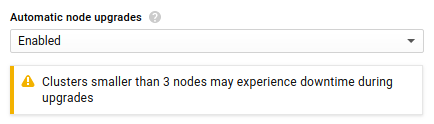
Then we’ll create an autoscaling cluster which will spin up a min of 36 and a max of 5 VMs if we run out of CPU when running K8s pods. We’ll also enable autoupgrade so that GKE handles upgrading the K8s version for us:
$ gcloud container clusters create captioned-images-app --enable-autoupgrade --enable-autoscaling --min-nodes=3 --max-nodes=5 --machine-type=g1-small --scopes=default,compute-rw,storage-rw,sql
There are lots of options available when creating clusters; you can explore them with:
$ gcloud container clusters create --help
Service accounts
We will be running our application under a service account, so let’s create that now and give it the necessary permissions for our project:
$ gcloud iam service-accounts create app-user
$ export APP_USER_EMAIL="$(gcloud iam service-accounts list --format=json | jq -r '.[] | select(.email | startswith("app-user@")) | .email')"
$ echo $APP_USER_EMAIL
[email protected]
$ gcloud projects add-iam-policy-binding $PROJECT_ID --member="serviceAccount:$APP_USER_EMAIL" --role='roles/storage.admin'
$ gcloud projects add-iam-policy-binding $PROJECT_ID --member="serviceAccount:$APP_USER_EMAIL" --role='roles/errorreporting.admin'
$ gcloud projects add-iam-policy-binding $PROJECT_ID --member="serviceAccount:$APP_USER_EMAIL" --role='roles/logging.admin'
$ gcloud projects add-iam-policy-binding $PROJECT_ID --member="serviceAccount:$APP_USER_EMAIL" --role='roles/monitoring.admin'
$ gcloud projects add-iam-policy-binding $PROJECT_ID --member="serviceAccount:$APP_USER_EMAIL" --role='roles/cloudtrace.agent'
We will also need a service account to control access to our SQL database:
$ gcloud iam service-accounts create sql-user
$ export SQL_USER_EMAIL="$(gcloud iam service-accounts list --format=json | jq -r '.[] | select(.email | startswith("sql-user@")) | .email')"
$ echo $SQL_USER_EMAIL
[email protected]
$ gcloud projects add-iam-policy-binding $PROJECT_ID --member="serviceAccount:$SQL_USER_EMAIL" --role='roles/cloudsql.client'
Google Container Registry
Now that our GCP resources are ready, we can prepare to actually run our app on GKE. But how do we make GKE aware of our Docker image?
Using GCP’s Docker registry of course, which is aptly named “Container Registry.” Let’s first enable the service:
$ gcloud services enable containerregistry.googleapis.com
$ gcloud services enable cloudbuild.googleapis.com
Now to get the image to Container Registry, we can do it a few ways:
- Build the image locally, and push the image blob from our machine directly to the registry
- Submit a .tar of our local source code to Container Builder, a service that performs remote Docker builds
- Set up a git repository mirror that auto-builds (using Container Builder) on every push
#1 is simple, but on my machine a locally-built image is 1.3GB (due to all the static and dynamic libs installed via apt-get), so that could take quite a while to upload to GCP if you have a slow upload speed like I do.
Let’s try #2 instead. Using Container Builder requires defining a cloudbuild.yaml file that tells it how to build the app. I’m a nice guy and already supplied that file, so we can just submit the build now. We’ll set the $COMMIT_SHA variable7 so that the build is tagged with our current git commit SHA:
$ export COMMIT_SHA=$(git rev-parse --verify HEAD)
$ echo $COMMIT_SHA
7401c9e91aaa7d1453a47c554a1528b48ffe2430
$ gcloud container builds submit --config cloudbuild.yaml --substitutions=COMMIT_SHA=$COMMIT_SHA
The source code tarball is only a couple megabytes so the remote build should start quickly. The output of the build will be streamed to your console. Container Builder uses pretty beefy VMs for the builds so it shouldn’t take very long to complete.
Once it’s finished, the image will be available with these two tags:
us.gcr.io/$PROJECT_ID/gke_demo:latest
us.gcr.io/$PROJECT_ID/gke_demo:$COMMIT_SHA
Container Builder is actually a pretty powerful service for its simplicity, and cloudbuild.yaml is capable of replacing simple build pipelines that you might traditionally reach for tools like Jenkins for.
End Part 1
That’s all for Part 1. So far we’ve got all our cloud resources created and ready to go.
Join me next in Part 2 where we’ll learn about Kubernetes and get our app up and running on GKE!
Thank you
HUGE thanks to my reviewers, Daniel Brice (@fried_brice) and Sunny R. Juneja (@sunnyrjuneja) for reviewing very rough drafts of this series of blog post and providing feedback. 😍 They stepped on a lot of rakes so that you didn’t have to - please give them a follow! 😀
Any mistakes in these posts remain of course solely my own.
Footnotes
-
After installing the Google Cloud SDK, it can be installed with
$ gcloud components install kubectl -
These config values can be grouped into sets confusingly called “configurations,” in case you want to change multiple config values at once (say if you’re switching between projects or deployment environments). We’ll stick to using the default configuration here for simplicity. ↩
-
We’ll create it as a regional storage class, since we’ll be setting cache-control headers that should allow the objects to be cacheable so that latencies are comparable to multi-region ↩
-
--helpcan be put at the end of pretty much any command and is very helpful for navigating and discovering gcloud usage ↩ -
A previous version of this post advised using
n1-standard-1(1 vCPU, 3.75GB RAM) for the cluster, which is the base level of the standard (non-shared-core) machine types. After testing it out I’ve decidedg1-smallis sufficient so I’ve revised the instructions. ↩ -
If you have less than three nodes in a cluster you may have downtime when upgrading Kubernetes. This is what the web console warns if you select less than three nodes:
-
$COMMIT_SHAis a special variable to Container Builder that it is automatically provided if you have Container Builder build your image from a GCP-hosted git repo. Since we’re submitting a manual build though, we have to provide the value as a substitution.It’s important to tag each build with the
$COMMIT_SHAbecause that is the best practice for image references during deployments - a mutable tag likelatestwould be confusing and might be ignored for certain update commands (the command may not know that thelatestreference changed, and not do anything). Thelatesttag will mainly be useful as a handy caching reference between builds. ↩